Using a Tailscale exit node with GitHub Actions
For an (ethical) scraping project I found that my low-volume scraper was working from my laptop but was being blocked by Cloudflare when I attempted to run it in GitHub Actions, presumably because the GitHub Actions IP range was disallowed.
I figured out how to use Tailscale to allow GitHub Actions to transparently proxy traffic via my home network - using a Tailscale exit node running on an Apple TV.
This took a few steps:
- Install the Tailscale app (from the App Store) on the Apple TV
- Configure the Apple TV as a "home hub". To do this I had to reconfigure my Apple TV to have a default iCloud account - we had previously configured it with no default account and two different associated accounts. I got various unhelpful error messages until I finally figured this out. The Apple documentation wasn't quite helpful enough here either.
- Configure the Apple TV to work as a Tailscale exit node. Here's the Tailscale guide to doing this - you configure it in the Apple TV app ("Run as Exit Node") and then separately in the Tailscale web console. The hardest part here was finding the option there - it was tucked away in the "..." menu against the Apple TV machine under "Edit route settings".
The great thing about an Apple TV for this is that it's an existing low power device that is always on and connected to the internet. A Raspberry Pi or similar would be another good choice.
The GitHub Actions workflow needs an OAuth client with credentials that allow it to join the Tailscale network.
First I needed to define a Tailscale "tag" for my OAuth client to use. I used the JSON editing interface at https://login.tailscale.com/admin/acls/file and added this:
...
	"tagOwners": {
		"tag:github-actions": ["autogroup:admin"],
	},
...
The OAuth client can then be created at https://login.tailscale.com/admin/settings/oauth
As far as I can tell this needs the "Devices: Core" scopes configured for both read and write access, plus a tag. It also needed read/write access for Auth Keys.
Here's how I configured that device access:
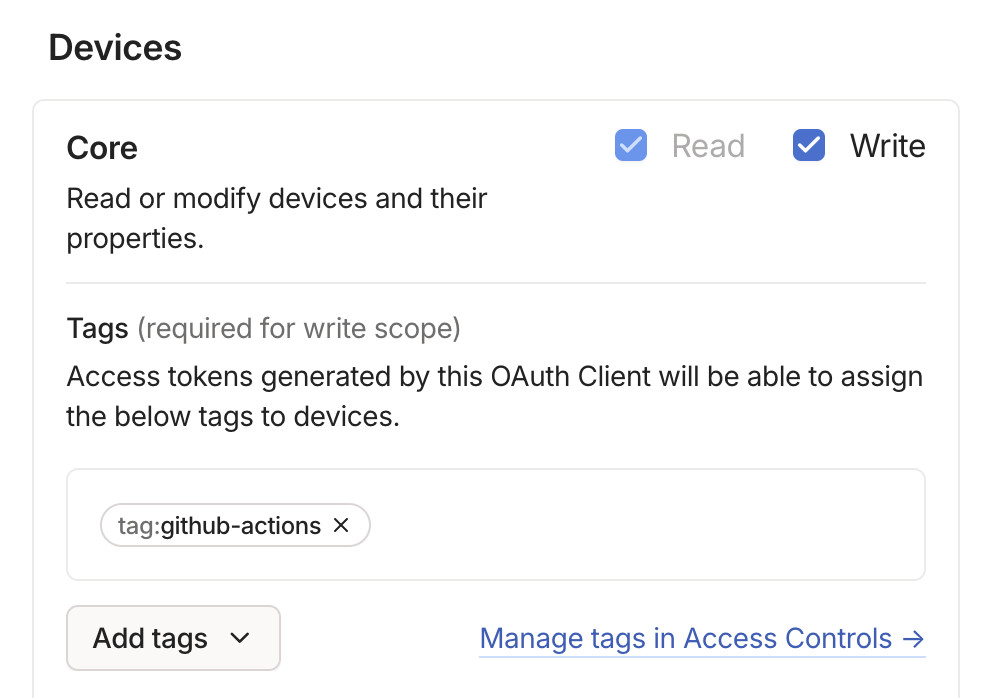
Plus I selected the read and write checkboxes for "Auth Keys".
This took a lot of experimenting, but eventually I figured out this recipe which works. I had to set three repository secrets first:
-
TAILSCALE_OAUTH_CLIENT_ID- for the OAuth client I created earlier -
TAILSCALE_OAUTH_SECRET- also for that client -
TAILSCALE_EXIT_NODE- I was hoping I could set this to the name of my Apple TV within Tailscale, but that didn't seem to work - here's a relevant Tailscale issue thread. Setting it to the Tailscale IP address of that device - which starts100.106....- worked for me.
Here's the YAML:
name: Tailscale exit node demo

on:
  workflow_dispatch:

jobs:
  run-with-tailscale:
    runs-on: ubuntu-latest

    steps:
      - name: Checkout repository
        uses: actions/checkout@v4

      - name: Show IP before Tailscale
        run: |
          echo "IP from ifconfig.me:"
          curl -s https://ifconfig.me

      - name: Setup Tailscale
        uses: tailscale/github-action@v3
        with:
          oauth-client-id: ${{ secrets.TAILSCALE_OAUTH_CLIENT_ID }}
          oauth-secret: ${{ secrets.TAILSCALE_OAUTH_SECRET }}
          args: "--exit-node=${{ secrets.TAILSCALE_EXIT_NODE }}"
          tags: tag:github-actions

      - name: Verify HTTP traffic is routed through exit node
        run: |
          echo "Available exit nodes:"
          tailscale status | grep 'exit node'

          echo "IP from ifconfig.me:"
          curl -s https://ifconfig.me
Since this sets workflows_dispatch as the trigger, I can run this by clicking the "Run workflow" button in the GitHub Actions UI.
When I ran the workflow I saw this, confirming that it works:
Show IP before Tailscale
Run echo "IP from ifconfig.me:"
IP from ifconfig.me:
20.57.71.203
Setup Tailscale - took nearly 2 minutes!
...
  shell: /usr/bin/bash --noprofile --norc -e -o pipefail {0}
  env:
    ADDITIONAL_ARGS: --exit-node=*** --exit-node-allow-lan-access=true
    HOSTNAME:
    TAILSCALE_AUTHKEY:
    TIMEOUT: 2m
    TS_EXPERIMENT_OAUTH_AUTHKEY: true
Verify HTTP traffic is routed through exit node
Run echo "Available exit nodes:"
Available exit nodes:
***  apple-tv             user@   tvOS    active; exit node; relay "sfo", tx 148 rx 0
IP from ifconfig.me:
67.... # my home IP address
Bill Mill gave me some great feedback on this article, including sharing this example of running a second command to set the exit node using its name rather than the IP address I describe above:
      - name: Setup Tailscale
        uses: tailscale/github-action@v3
        with:
          oauth-client-id: ${{ secrets.TAILSCALE_OAUTH_CLIENT_ID }}
          oauth-secret: ${{ secrets.TAILSCALE_OAUTH_SECRET }}
          tags: tag:github-actions

      # you can't set the exit-node name at 'up' time; so instead set it after
      # we've gotten up and running
      # https://github.com/tailscale/github-action/issues/123
      # https://github.com/tailscale/tailscale/issues/4152#issuecomment-1066126643
      - name: use named exit node in tailscale
        run: |
          timeout 5m sudo -E tailscale set --exit-node=apple-tv --exit-node-allow-lan-access=true
I had to look up that sudo -E option - it's short for --preserve-env and causes the user's current environment to be inherited by the command that is running with elevated privileges.
Created 2025-02-22T18:29:31-08:00, updated 2025-02-23T10:14:23-08:00 · History · Edit